Methods & Tools
Tools and applications used in this project include:
- FFmpeg
- ImageJ
- ImagePlot macro developed by the Software Studies Initiative
These tools are free and open-source. FFmpeg perhaps carries the steeper learning curve in that its use requires familiarity with the command-line and knowledge of FFmpeg command structure and syntax. Alternatively, ImageJ, a GUI-based image analysis application developed by the National Institute of Health, has a multitude of functionalities, options, and settings which may not be immediately intuitive to novice users. Information related to using these tools can be found in the Resources & Learning Tools section of this site.
- For those who might want an alternative to ImageJ: Imj is a browser-based image analysis tool developed by Zach Whalen that, while not as powerful and versatile as ImageJ, offers a much lower barrier of entry and technical requirements for conducting some of the image analysis operations described in the Analysis section. I definitely recommend anyone who is new to this area take advantage of this incredibly useful and user-friendly tool, as I did when I first started this research.
A note on source materials
All materials used in this project were sourced from Criterion Collection DVDs in the United States. As such, these versions of Ozu’s films represent the most “authoritative” and “definitive” versions as are available to me working in early 2020. English subtitles were left out in the interest of capturing only features that could be found in the original image. Criterion provides great documentation as to the technical specifications and other information related to filmic source materials for many of its releases, and I would encourage anyone wishing to know more about these important details to seek out the various “liner notes” available:
- Equinox Flower, Late Autumn, and The End of Summer can be found on the Late Ozu boxset under the Eclipse imprint
- Good Morning
- Floating Weeds
- An Autumn Afternoon
Extracting a series of stills or “slices” from a digital video file
As described by both Sample and Ferguson, one way of beginning the process of visually analyzing a motion-picture is convert the time-based media into a series of still images that can be more malleably manipulated by image analysis software. A number of methods exist for performing this task. As Ferguson describes, the Export feature built into the Quicktime Media Player (native to Mac OSX) can accomplish this in a fairly straightforward way. Similarly, Mark Sample’s “Sample Reality” blog provides helpful step-by-step instructions for the same procedure using the VLC media player.
The method I will provide here uses an FFmpeg command to create a series of still images. The benefits of this method are two-fold: 1) it does not rely on access to proprietary software like Quicktime and 2) unlike the VLC method—which requires a video file be played back in real time—the FFmpeg command will extract stills at a regular interval over any duration in a fraction of the actual duration. Additionally, the FFmpeg method allows for more control over the image output with regard to maintaining important formal characteristics like the aspect ratio.
The following command, modified from an example provided on the FFmpeg Wiki after consulting with the good folks who run the FFmpeg Twitter account, was used to create the stills:
ffmpeg -i inputvideo.mp4 -vf fps=0.5,"scale=iw*sar:ih,setsar=1" directory/outputname_%04d.png
This command consists of four key parts:
ffmpeg= calls ffmpeg to start the command-i inputvideo.mp4= specifies the input file (in practice this would be the actual name of the video file)-vf fps=0.5,"scale=iw*sar:ih,setsar=1"= this “video filter” (-vf) samples 1 frame for every 2 seconds of video and scales the output to square pixels (see below for an explanation of why this is an important modification)directory/outputname_%04d.png= specifies the directory for the stills to be saved, a sequential naming convention (outputname_0001, outputname_0002, and so on), and file format for the stills (this can, alternatively, be.jpgor another file-type)
After running this command, the output directory will become populated with still images, sequentially numbered and running the length of the video file (for a feature-length film, this will be 2,000-4,000 image files).
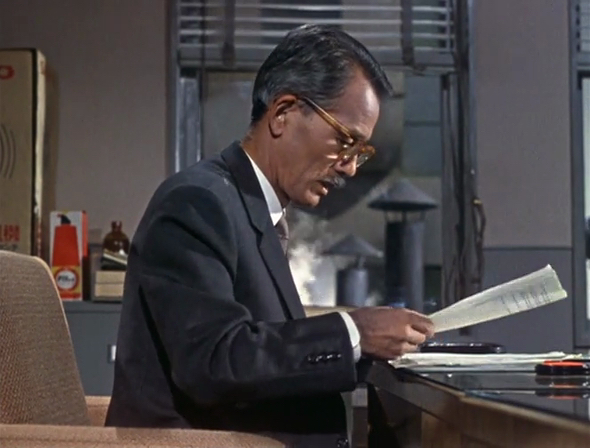
Let’s see what happens when we execute this script on An Autumn Afternoon (1962). Executed as written above, the outputted stills will look like this:
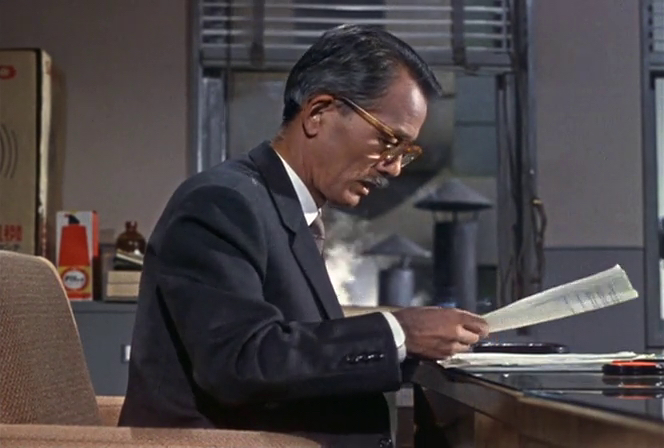
If, however, we run the command without the "scale" option, our stills will look like this:
Notice how this second image looks “squished” or “stretched” in comparison to the first. This distortion is caused by the non-square aspect ratio of the pixels in the source video. These need to be re-encoded to square aspect ratio in the stills using the "scale" modification. This, in turn, renders the full image in the proper 1.37:1 “Academy” aspect ratio (note that pixel and image aspect ratios are two related, but different, features of a digital image). While the question of pixel or image aspect ratio may seem like a small technical detail, I make a point of this because, for the purposes of analyzing the formal and expressive characteristics of Ozu’s work, it is important that our captured data (or capta, as Johanna Drucker reminds us) align as closely as possible to the films’ construction. Unlike many of their contemporaries, Ozu never made feature films using popular widescreen cinematography first introduced in the early 1950s. As accounted by David Bordwell, Ozu is quoted comparing the widescreen frame of CinemaScope to a roll of toilet paper. They remained committed to the canvas of the Academy aspect ratio throughout their career making sound films.
As such, this is one instance where opting to not “deform” one feature of the original object of study is an important decision to our critical project as it helps to maintain an important fundamental, formal quality of the work. To put this in a bit more context, the issue of altering motion picture aspect ratios has been a problem for film scholars since at least the advent of home-video systems in the 1970s and the subsequent release of “pan and scan” versions of originally widescreen feature films on those formats. These versions almost always leave out important cinematographic and/or narrative aspects of the original work, an issue that persists to the present day. A cursory web-search will find many instances of streaming services presenting moving-image content either in the wrong aspect ratio entirely, so much that it alters the meaning of the content left in the frame, or in other altered, “cropped” versions. While the “stretching” or “squishing” effect we see in the above example is almost the inverse of these “pan and scan” or cropping distortions, the decision to maintain the original aspect ratio of Ozu’s films in this project is in the service of walking a middle course between deformative and deformed approaches. This approach seeks to create new, stand-alone works that also have value in their capacity to help us “read” the original object in a novel way while acknowledging the complex and, at times, destructive history of shifting films’ aspect ratios through both analog and digital distribution networks.
For more information on the often very confusing issues related to pixel aspect ratio, see the Resources & Learning Tools section of this site.
Now that we have converted our digital video files into still images, we can leverage the functionalities of ImageJ to critically investigate Ozu’s uses of color.
Next: Analysis & Conclusions

This work is licensed under a Creative Commons Attribution-NonCommercial 4.0 International License.

